This year, I'm teaching Algebra 1 and Algebra 2 for the third time and Trigonometry for the first time. Every year, my school offers a different advanced math elective above Algebra 2. We've cycled through college algebra and statistics. They were both just okay. But, this year, I am LOVING trig.
I think there are several reasons for this. First, it's my first year to do interactive notebooks with my advanced math class. I guess for my first two years of teaching, I didn't think my advanced students really needed notebooks. I was wrong. They need notebooks. And, maybe even more than that, I need notebooks. As
Megan can attest, I kinda like interactive notebooks. :) Then, there's also the fact that I have 15 kids in my trig class to get excited about! In the past, we've only had 5-7 kids enrolled in advanced math. (Have you ever tried to collect data to analyze in a class of 5 kids? So many of the ideas I wanted to try needed more kids to make them work.) I've taught all but 3 of these kids before, so they already get me and my teaching style. They are working super hard for me, and the notebooks have been a big hit!
Our first unit for trig was a review of algebra and geometry. This is especially important for this group of kids because some of them have taken a year long break between math classes. You can forget a lot of math during a year of no math. These students were in my Algebra 2 class my first year at Drumright. And, you can forget a lot of geometry concepts during a year of Algebra 2! It's refreshing to teach a class that does not require a state-mandated end-of-instruction exam. We have no curriculum that we *have* to cover. We're moving at our own pace, and I have no clue how far we are going to end up getting. I'm hoping to wrap up our study of trig by January/February so we can fit in a few months of other pre-calculus topics this year.
Though, I'm not sure if that will happen. Many of my students have expressed an interest in our school offering an ACT prep class. Last year, I stayed after school one day a week for a month or two to help a group of students prepare for the ACT. I would love to teach an ACT prep class, but our school is too small to offer electives beyond agriculture, FACS, Spanish, FACS, or computers. And, this is the first time we're offering Spanish in the 3 years I've been here. I've decided to dedicate Fridays as ACT prep days. We're working through practice math problems under the testing condition of one minute per question. I'm hoping it proves to be useful to my students in raising their ACT scores!
Oh, and another thing that makes this advanced math class different than previous years is that I'm using standards based grading. I've played with SBG a little in my Algebra 2 class before, but this year I decided to go all out. I do not regret this decision!
For my learning goals, I slightly tweaked
Elissa's Unit 1 Learning Goals for her trig class.
Here's my modified version:
Each student was given this score tracking sheet to keep at the front of their Unit 1 notebook section. Each unit in our notebook begins with a score tracking sheet, a table of contents, and a tab.
My SBG grading scale has 3 levels.
A = Perfect Work (100% in Grade Book)
B = Demonstrates understanding but work may have a few minor errors (85% in Grade Book)
NOT YET = Student has not demonstrated mastery. (0.5% in Grade Book)
Students are required to reassess all on NOT YET quizzes until they earn an A or a B. Once students have earned an A or a B, they can place a sticker in the mastery box on their score tracking sheet. I have a tub of stickers that students can pick from. I guess you could call it a self-service sticker station. :)
The consequences of this new grading process have been...interesting. Some students love it. Others hate it and have left my room in tears. The negative feedback has been greater than I anticipated, but I'm sticking with it. I have the support of my administration, and I believe I'm acting in the best interest of my students. This should probably be an entire blog post in itself.
Ready to see in side my trig notebook? I'm so excited to share it with you!
Title Page:
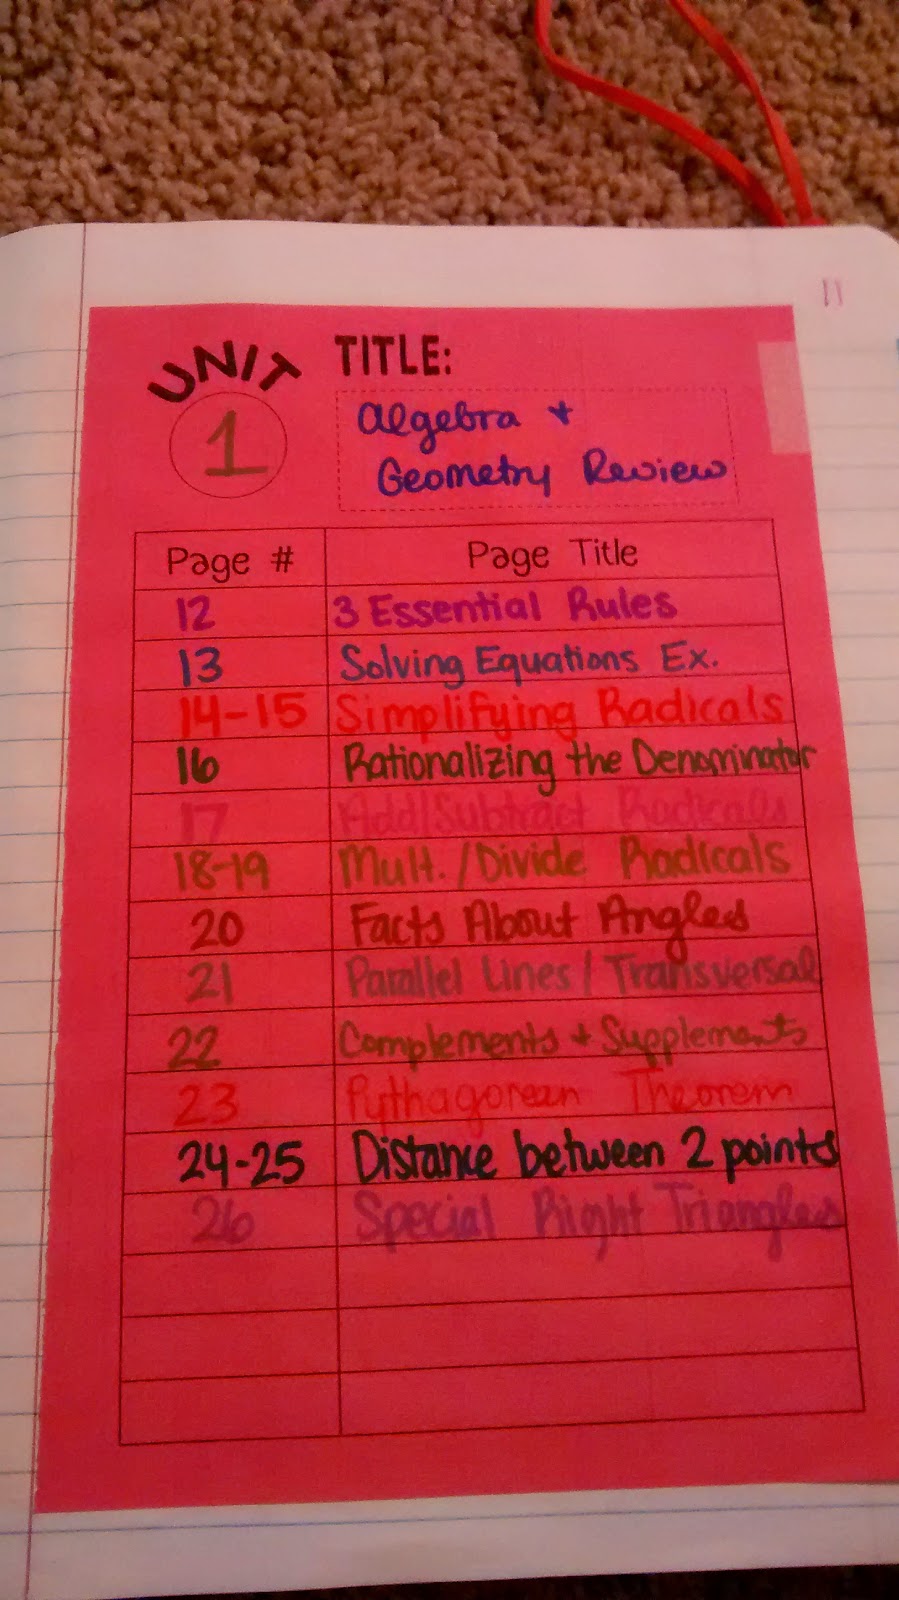
Unit 1 Table of Contents
Here's the score tracking sheet next to the TOC.
A student's copy with some mastery stickers.
At Twitter Math Camp, I had a terrible time figuring out which morning session I wanted to attend. You see, I teach Algebra 1, Algebra 2, and Trig/Pre-Calculus. So, I could have easily gone to any of those three sessions. I ended up being a part of Elizabeth's Group Work Working Group, and I don't regret it at all. But, I still wish I could have gone to all of them!
In one session I attended, we were given the task of creating a lesson or task in a small group. One of the people in my group had been a part of the Algebra 2 morning session. And, she mentioned Glenn's 3 Essential Rules of Math. We were instantly intrigued and made her tell us more. We never actually ended up designing our task, but we did all walk away with some exciting ideas to use in our classrooms, and I think that's what TMC was all about anyway.
Here's a
link to where Glenn discusses the 3 rules. He does a way better job of explaining it than I ever could. I can make a pretty notebook page about it though. :)
By the time students get to trig, they should be able to solve equations. But, I wanted to start the year off with a quick refresher. I included the properties to remember box at the bottom for students to record various properties in as we come across them in problems.
I planned 3 example problems to work out in our notebooks.
My kids hated having to write out the justification for doing each step.
But, that's nothing compared to the riot that almost broken out after trying to solve a problem that involved factoring a trinomial. It was totally my fault. You see, I have this problem with teaching factoring. In my first two years of teaching, I taught factoring 4 different ways. My Algebra 1 teacher taught us to guess and check in the 8th grade. I never knew there was another way. After realizing how tedious that method was once I began teaching, I went looking for a better way. That same year, I tried the airplane method of factoring. It went better than guess and check, but kids could never remember the steps. Year 2 comes along. I learned the Slide, Divide, Bottoms Up Method at a workshop. I decide to try it. Again, it works, but the kids can't memorize the steps. And, why should they? The steps make ZERO sense whatsoever. They work, but they're a trick. And, we're supposed to be nixing the tricks.
Finally, Shelli showed me how to split the middle term of the trinomial in two and factor by grouping. I LOVE this method. But, my kids who had already seen one of the trick methods saw it as a lot of work and thinking. So, they were not excited to use it. Okay. Back to the almost-riot. I start working through an example that involves factoring. As soon as I start splitting the middle term, a student raises their hand and asks why we can't do the method from last year. They don't remember what it was, but they know it wasn't this. Another student who I had in Algebra 2 two years ago wants to use the airplane method. Then, I have students in my classroom who took Algebra 2 at another school or our local technology center. They learned yet another way to factor. OH MY GOODNESS. It was terrible. More like on the verge of tears terrible. Honestly, I finished the problem, handed out the homework assignment and asked them to cross out all of the problems involving factoring. I needed to make up my mind about how to approach factoring from here on out.
Here we are, over a month into the school year, and I'm still avoiding factoring with my trig students. Eventually, we will have to overcome this hurdle. Until then, I'm still working on my game plan. Note to self: find one way to teach factoring and teach it that same exact way for the next thirty years of your career.
Next topic to review: Radicals
If these notes look familiar, it's because they are. I took my unit on radicals from Algebra 2 last year and condensed it into a quick review. After all, there's no sense in reinventing the wheel. (I've posted extensively on how I taught radicals before
here and
here.)
I still love the birthday cake method for finding prime factorization. Since I had almost all of my trig students in Algebra 2, I neglected to mention to the class that the 1 on top of the birthday cake was the candle. One student who wasn't in my Algebra 2 class was SUPER confused by what this new math symbol was on top. Oops. (You can read more about the birthday cake method for prime factorization
here.)
Also, my trig students thought that our review of simplifying radicals and performing operations on radicals was the easiest thing in the world. These are the same kids who HATED radicals last year in Algebra 2. For days, all I heard was, "Why is this so easy this year? I did not get radicals last year. But, now I'm like "How could someone not understand this?"" They finally decided that their brains matured over the summer or something like that. All I know is that seeing them work with radicals so confidently made me a very proud.
Here's our simplifying radicals notes together.
Next up: Rationalizing the Denominator
Again, they were shocked that rationalizing the denominator was not as complicated as they had made it in Algebra 2. Adding and subtracting radicals also went very smoothly.
The one problem with my unit on radicals is that if somebody entered my classroom and listened in on our conversation, they would probably think we were crazy. My kids don't talk about "simplifying radicals." They say, "Oh, I need to birthday cake it." By birthday cake, they mean find the prime factorization and use that to simplify the radical. I know exactly what they mean, but I should probably work on fixing this vocab issue in the future.
Multiplying and dividing radicals did not go nearly as well as adding and subtracting. I still need to work on this.
The distributing problems proved especially difficult for them.
And, I need to come up with a way to make dividing radicals seem less scary. After we wrote out the six steps, they were in panic mode. The actual process wasn't that bad, but I made it sound terrifying.
At this point, my kids were begging, "Can we just do radicals for the rest of the year?" Ha ha. No.
Now it was time to begin a little geometry review. I've never taught geometry before, so this was a fun experience for me!
We started off by taking some notes about useful angle facts.
I borrowed the amazing Kathryn's
Angles Formed by Parallel Lines Cut by a Transversal Foldable.
Here's the inside:
Kathryn took many more detailed pictures of the inside flaps and posted them on her blog. You should definitely check it out!
Fair warning. My kids hated the next notebook page. You may think hate is a strong word. But, I'm serious. You see, I thought I would be creative. And, I guess I didn't think my creativity all of the way through.
Class, use a marker, highlighter, or colored pencil to draw a giant C on your notebook page.
Inside the C, we were going to take notes on the meaning of "complementary angles."
Then, we were going to turn the C into an S and add notes about supplementary angles.
If they could remember that complementary meant 90 degrees, the S was made up of two Cs, so that would mean 90 degrees times 2 or 180 degrees.
Great idea, right?
Well, I didn't tell my kids what the end product was going to be. So, they drew some Cs that could not be made into attractive Ss. Oops. Their notebook pages were not pretty and perfect now, and it was all my fault. One of the students in class decided that I had earned myself a "NOT YET" for the day. Remember my grading scale? Now, my students are using it to get back at me... On a side note, they also decided to give the pencil sharpener a NOT YET one day because it made their pencil point too sharp...
Ironically, when I went to put the C/S drawing in my notebook, mine turned out looking not that great either. I guess that was payback. I sketched it out several times on scrap paper, but putting marker to notebook paper proved to have less than stellar results.
Here's some of my students' pages.
This student insisted on gluing colored paper over his botched attempt and crafting a perfect C/S combination.
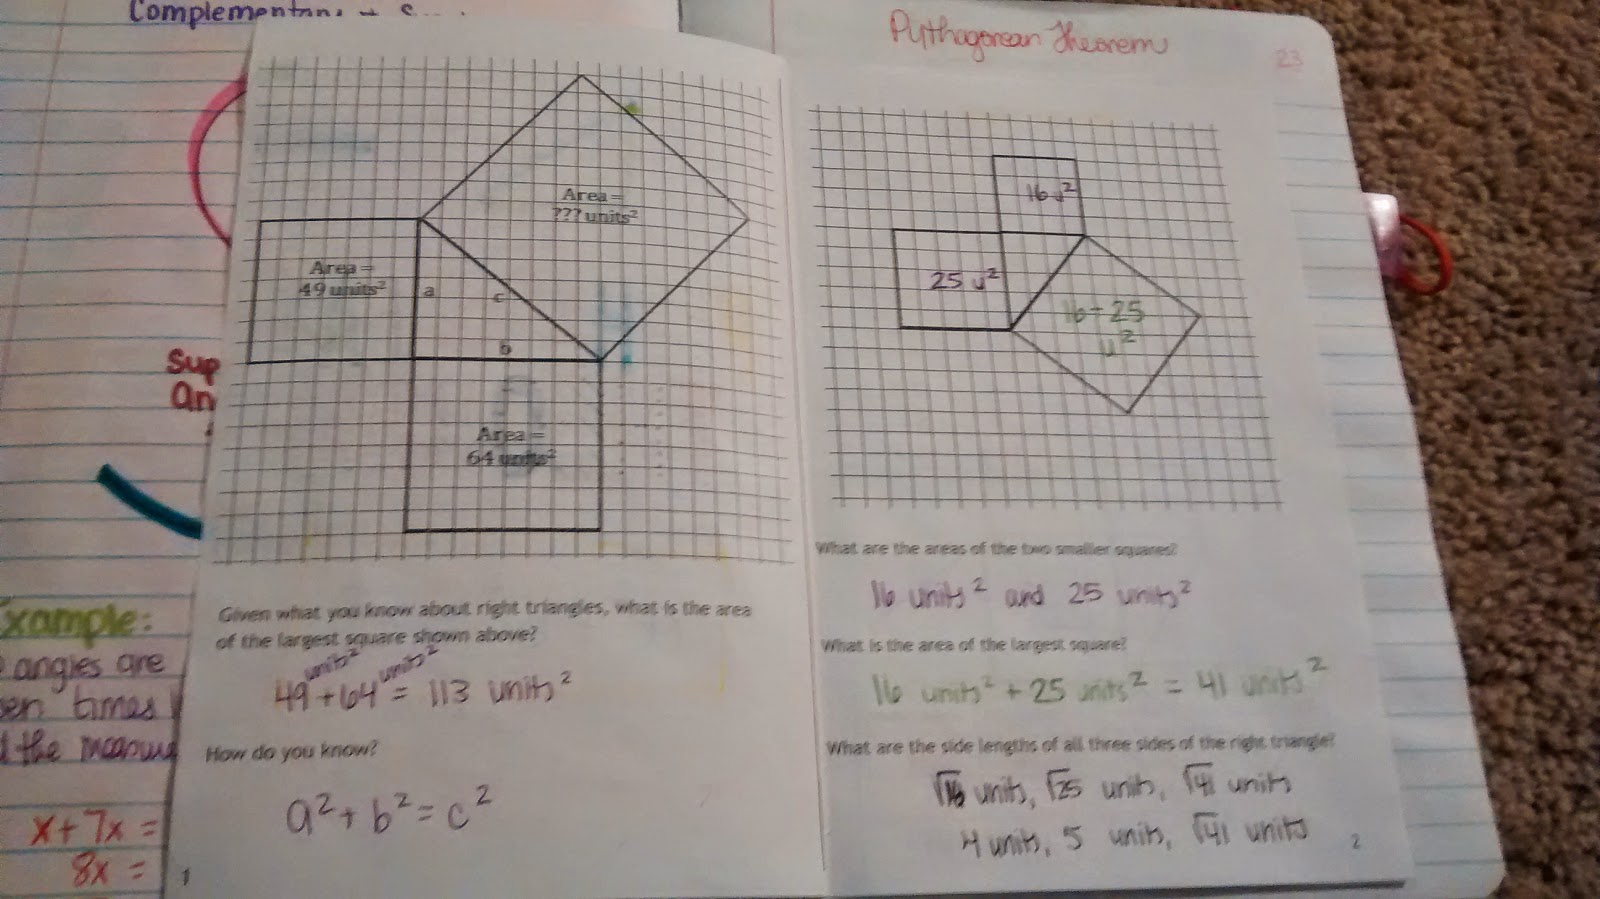
Our next geometry topic to review as the pythagorean theorem.
The Pythagorean Theorem booklet was stole from the
blog of Jessie Hester. She has a ton of resources for teaching the Pythagorean Theorem! If I was teaching geometry, I would have gone way more in depth and used a lot more of her amazing activities!
As soon as I passed out the booklets, my trig students wanted to know if I would give them time to color the covers. Yes, we did take some time to just sit and color. It's fun to watch my trig students get so invested in creating their notebooks! I'm actually kinda glad that my school does not own any trig or pre-calculus books because I probably wouldn't be doing notebooks with this specific class if they did.
Inside the Pythagorean Theorem Booklet:
I liked the table set-up for these pythagorean theorem problems a lot! I would have never thought of setting them up this way.
This next page was also stolen from
Jessie Hester.
This was a new foldable type for me. I love trying out new foldable designs! The flap folds down to reveal two more flaps underneath. :)
I'm going to be honest. I'm a math teacher, and I have to really, really, really think about the distance formula. It's just not something I have memorized off the top of my head. I know how to derive it, and I can come up with it if you give me a minute. But, it's not my weapon of choice for calculating the distance between two points. I prefer to use the Pythagorean Theorem for finding the distance between two points, but I wanted to show my students both options and let them choose for themselves.
They agreed with me that the pythagorean theorem made the work of the problem seem a lot more efficient. And, since I have students who really struggle with integers, they liked the fact that there were a lot less positives and negatives to watch out for.
I printed off this practice sheet from Jessie's blog for students to glue in their notebooks.
Here's our notes for finding distance between two points together.
Our last geometry topic to review before delving into actual trigonometry was special right triangles. I don't know exactly what it is about special right triangles, but I LOVE them. Okay. I guess I say that about a whole lot of math topics. I guess this means I'm in the right profession. :)
Me: Class, today we are going to be learning about two special types of right triangles. These two triangles are going to become your BFFs.
Student: You said there are two of these triangles?
Me: Yes.
Student: Oh goody. That means I will have at least two friends now.
My students make me laugh so much. They are the best.
My entire goal for interactive notebooks is to create a resource for my students that they actually use. I decided that we would put each of the special right triangles on an index card. Then, we made a cute little pocket to hold the cards in our notebooks. The kids got SO excited over these little pockets.
Here's what we wrote on our reference cards:
The idea behind these cards is that students could keep them out while working on their assignments. When I teach trig again, I will tweak these cards a bit. I would have students label the 45-45-90 card as a; a; a radical two right underneath the 45-45-90 heading. And, I'd do the same for the 30-60-90 card. I do like that students had to check which side length was opposite the angle they were interested in. This really made them stop and think about what opposite means on a triangle.
One of my students thought that making the cards was a silly little exercise. But, a day or two later, she told the class that these were the most helpful things in the world. It was awesome to watch my students use these cards and encourage their classmates to use them as well. Hearing them tell somebody to get out their cards and use them = PRICELESS!
I would love to find a way to include more index cards in my notebooks in the future. Hmmm....
A go-to foldable for me to make is a poof booklet. I have a file on my computer where I can quickly change out the practice problems, and I instantly have a new foldable to use. My students never cease to be amazed by these poof booklets!
I think the smiling right triangle adds the perfect finishing touch to the page! :)
Inside the booklet:
I made students circle whether the triangle represented a 30-60-90 right triangle or a 45-45-90 right triangle. In the future, I would probably have students fill in the blanks for both the angles and the side length ratios so they sat exactly on top of each other. Hindsight is 20/20.
Because I LOVE my students, I also included two word problems.
For more info on how to assemble a poof booklet, check out this
tutorial I wrote for a poof booklet for another topic.
And, that was the end of Unit 1. Unit 2 is all about trig ratios and trig basics. I'll be posting those pages as soon as the unit is finished.
Want to download these pages to use in your own classroom?
Click here to find all of my Unit 1 materials.